

We HAD three citrus trees in our backyard. They were lined up at the west end of our pool (top right of the photo below).
The middle tree was called, "Frankencitrus." It had lemon-esque fruit on it, but the fruit had absolutely ZERO flavor. Ick. A tree nursery person told us that citrus trees are grafted onto citrus tree stumps. Sometimes they don't take to the stump or something like that and they end up being a Frankencitrus. So, I chopped it down:

What I wanted to put in place of Frankencitrus was a swanky backyard retreat with pavers, a covering and a really cool gas fire pit with glass beads. I draw this up in Blender 3D to get an idea of the space:

Of course, it goes without saying, even though I'm about to say it, that it would be ULTRA-SUPER-COOL if I could get the pavers to float approximately 3 to 5 inches above the dirt, like they do in the rendering. The brown layer below the pavers is ground and the gap is meant to show where the base material will go. The rendering shows extra bricks in the corners and whatnot because building things virtually in 3D environments makes the construction process seem easier than it really is, so I thought I would design in rounded corners all over the place. That was dumb.
I excavated the area the old fashioned way: I used a wheel barrow and a shovel.

Since this thing was to butt up against the edge of our pool decking, I needed the final surface of the pavers to be level with the decking as closely as possible. Since I'd only ever seen pavers installed on DIY Network on TV, I figured that if the surfaces were within an inch of each other, that'd be plenty OK by me.
Frankencitrus's stump was not going to go easily, so at one point I decided to just leave the damn thing in a hole under the fire pit. But, the nagging little perfectionist voice in my head told me that it would haunt me the rest of my life if I didn't at least TRY to fully remove the stupid stump. Eventually, I was able to chop it out of the hole.
The completed excavation looked like this:

I enlisted (read: fed and provided beer to) my buddy Jake to help with the filling, leveling and compacting of the base material. He and I did it in about a half-day. Not bad. We probably burned a calories each for the 3,000 lbs. of material we moved and smashed.

Just like on DIY Network, we used steel pipes as a leveling assistant for each one-inch layer we compacted. Three layers got us right to the proper level to make the bricks flush with the surface of the pool decking, believe it or not! Awesome. Lucky amateurs.
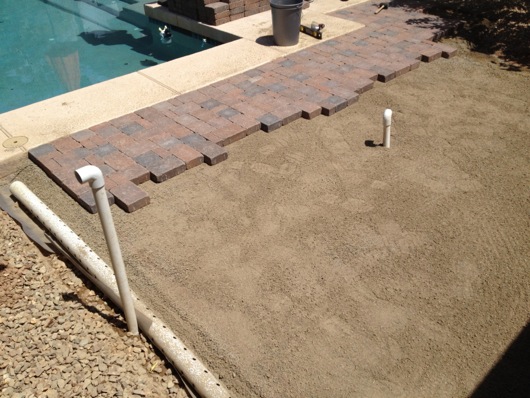
The base was really solid. I was very pleased with it. The plan for the fire pit was to have a tank of propane off to the side of the pavers hidden in a miniature outhouse. I hadn't thought about the final design of the outhouse, but I knew I at least needed that conduit to carry the gas under the pavers to the big pit bowl. That's what the two periscope-looking things are sticking up in the middle of the base material and the left edge of the photo. The bigger pipe with the holes is for draining water AROUND the area instead of under it. In the photo above, the water in our yard runs from left to right (back of the yard to the street).
The pavers we chose are made here in Arizona by the place we purchased the base material from. They're meant to be randomly placed so that no discernable pattern can be seen. That was fairly tough to pull off, but I managed to get it done with only 12 square pieces left. I did have to chop a few squares into slimmer pieces called, "twinkies." Here's the completed paver job:
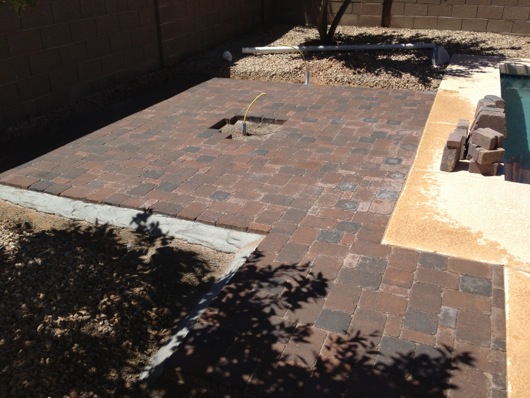
I used Type S mortar around the edges (Type S has everything in it and just needs water) to hold the edges in place. I used polymeric sand between the pavers. The slope is gradual away from the pool and everything turned out great for my first paver job. Now on to the fire pit...

The fire ring is actually TWO rings in one. It's 24" diameter on the outer ring and about 12" on the inner ring. The pan in which the ring and the glass beads will sit is designed for the paver stone that will be used in the fire pit. I wanted a big ring to get good flame coverage over the beads. I took the advice of a barbecue/fireplace guy and made a screen that goes below the ring on top of the ring to keep the glass beads from mingling with the pea gravel below the ring. I bought a piece of metal lath (used in stucco work and whatnot), cut it into a circle the proper size of the fire pan and painted it black with black barbecue grill paint. You'll see it in a bit.
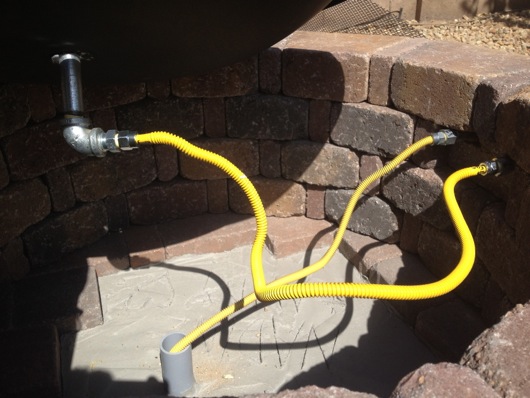
Next, I ran yellow flexible gas line through my under-paver conduit and got it read for the emergency shut-off valve and the fire pan at the pit end of the conduit.

I measured and centered the first layer of the fire pit body. There are four rings of pavers total. Each ring is rotated half of a trapezoid paver and all layers are secured to each other with Liquid Nails®. Stuff is amazing. The final fire pit brick build looks like this:

UPDATE (May 2015): Several readers have asked about how many pavers are in the completed fire pit. I used 48 each of the RumbleStone "Mini" and "Trapezoid" pavers for mine. RumbleStone has a brochure with tons of great ideas in it and their recipe for a fire pit calls for only three layers of paver rings, or 36 each of the Minis and Traps. I added a ring to raise up the ledge so it was more conducive to use as a coffee table. :)
Law requires that there is a shut-off valve within something like three feet of the burning thing, so I notched out a space in one of the trapezoid pavers to hold the valve assembly:
Here's what it looks like installed:

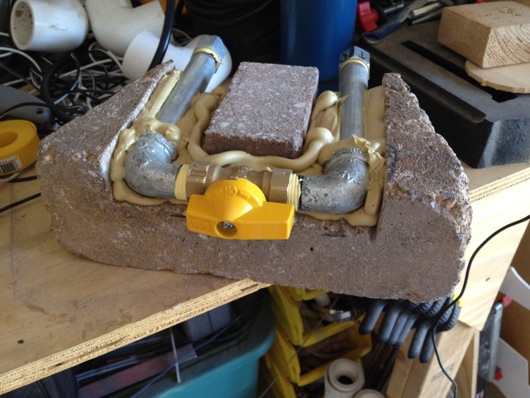
The pan for the pit is about 35" in diameter, give or take. I put a hole in it, as it was intended to be used for wood. I fitted half-inch steel pipe through the hole and into the bottom of the ring and added a 90-degree elbow to it and then connected all of the stuff together under the pan:
The yellow line comes up from the under-paver conduit, connects to one side of the shut-off valve, then a short piece of yellow line goes from the shut-off valve to the steel elbow. All of the connections between the gas pieces have yellow tape on them to seal them nicely.
UPDATE: That yellow line blows goats! Actually, it whistles horribly, like the whine from a jet engine, kinda. The whistling comes from resonance inside the line caused by the gas flying over the ridges in the line. You can totally blow into a piece of the line and it will whistle. It's like an instrument. You could add a new section to the orchestra: The GAS section. After a few minutes of research, I found out they make a super-cool type of flexible line that prevents the whistling. Check out this page for an example. If you live in the southeast valley in the metro Phoenix area, I HIGHLY recommend you visit Brooksies Propane on Alma School Rd. in Chandler, AZ. They sell all manner of gas accessories and they fill tanks for cheap. I found the quiet lines at Brooksies cheaper than I found it on-line, FYI. They also steered my to the high-pressure regulator for the size of ring we have. The low-pressure regulator does not provide enough flow to make the fire worth a darn. The BBQ store people knew not of what they spoke.
The pan was then filled with pea gravel (yes, I know the photo has larger rocks in it, but those were there for testing purposes and I forgot to take a picture of the pea gravel before I poured all of the beads into it).
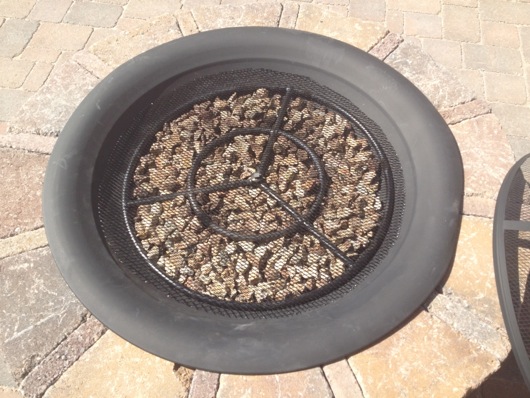
Then I put 40 lbs. of fire glass beads (30 lbs. of clear and 10 lbs. of dark red) and spread them onto the screen:

Here is a shot of the beads fully spread onto the pit:

Next, the tank side of the gas fire pit needed to be assembled. Originally, I was told by barbecue store guys that I needed this kind of regulator for the tank and for the size of ring (they sold me the ring, as well):

When I hooked this regulator up to the system, all I got in my fire pit was sputtering blue flames dancing around under the ring:

Turns out the barbecue store guys aren't really versed in building big-ass fire pits. The other important piece of information that the guys at the barbecue store got wrong was that propane gas rings are to be holes-up, natural gas rings are holes-down. They got it backwards and this is a very important piece of the fire pit puzzle. When I went to a genuine propane place that also sold parts and grills and whatnot, they corrected me on the holes-up/holes-down rule and then sold me the PROPER high-pressure regulator:

This HP regulator came with a copper tube that had ends that made all of this stuff fit together perfectly:

UPDATE: I've gotten quite a few requests for the make and model of the regulator. Sorry I didn't include it earlier. It's a Marshall Escelsior MEG-6120-100 (http://www.marshallexcelsior.com/product.php?id=2553). I recall I paid about $30 to $40 for it in Arizona. On-line, that seems to be reasonable.
The other end fits into the regulator:

With this newfound information and hardware and one more trip to ACE Hardware® for a missing coupler, I finally had everything I needed to make FIRE without the need to use sticks!! Behold my FIRE!!!

By the by... That's with the regulator turned nearly all the way DOWN to LOW! When I cranked it up, not only did I get Hollywood-sized special effects flames, I got a nasty-loud whining from the ring. I'm guessing the tank was playing that ring like a flute. Not sure, though. Clearly I'm the LAST guy you ask for propane answers.
The sad but temporary end to the FIRE!! part of this fun DIY story is that the Phoenix region is experiencing its usual summertime 110-degree weather and using a fire pit for the next bunch of months is stupid. But, wait! There's still an outhouse to build!
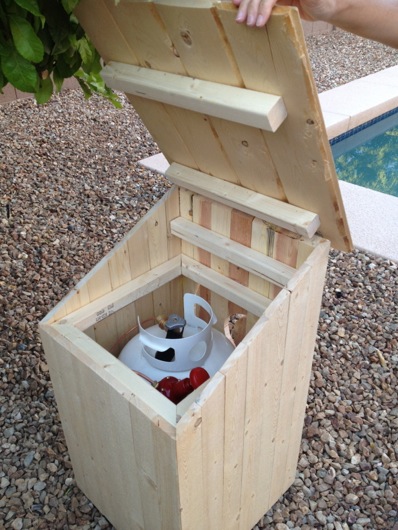
I drew up some highly technical and serious plans for the covering for the propane tank:

I couldn't get measurements on the army tank, so I built everything based on the dimensions of the LP tank. The outhouse was built to sit on a 16" by 16" walkway tile. I notched a corner out of the tile for the gas line conduit to pop up through. I ran to Lowe's® and searched for rough looking pine planks and found the perfect matches to build a mini outhouse. If there is any interest, I can take more photos of the structure and write up how I built it, but it's pretty straightforward. Here's the outhouse without the decorative hinges, lock and handles:

The roof of the outhouse lifts open to give us access to the regulator and the tank. The tank sits perfectly inside so that it and the regulator are protected from the elements well enough. The outer planks of the outhouse sit around the walkway tile base. One of the supporting rings inside the outhouse sits on top of the tile.
To make the outhouse extra nifty, I added black hinges to the front door that does not actually open. To keep people from trying to open the door, I also put a decorative lock on the door. However, we have enough drunk people visit that someone will probably pull off the front door handle trying to get into pee in our outhouse. Here's the outhouse with the fake hardware (well, the handles are real because they make it easier to lift up the outhouse to switch out the tanke and the silver hinges under the front of the roof are for opening the roof). Stop nitpicking.

Here's the final set up:

Can't wait for winter!!!
What's the takeaway on this project? Doing pavers in June in Phoenix sucks donkee buttcheeks. I'm thinking that doing pavers in an wonderfully air conditioned gymnasium would still suck just as bad. Building a fire pit isn't so bad, especially since the pavers for that are like super-heavy, non-plastic, non-interlocking LEGO® blocks. The outhouse was really fun to build because the closer to finished it got, the hard I laughed at it. Once we get the pergola up on the pavers (http://low.es/NqLyb9), this will be the bestest place ever [in our back yard] to hang out when it's chilly and drink wine and stare at flames like bugs drawn to a bug zapper.
UPDATE: Here are a couple of pictures of actual usage of the fire pit in colder weather:

