Starting the next generation Fitbit Cheat-O-Matic, but changing the name, switching to proper high-end bearings, and make a sturdier base and cam follower mechanism. Should be slick if everything fits nicely and plays nicely.
It's been a little while since I posted an update on the latest version of the Office Chairiot motorized office chair (the, "Mark II"). I usually add little pieces of updates to the project site for it on Local Motors' personal project website, since I plan on utilizing their facilities to push it to 11.
What is electric, goes somewhere between 15 and 20 miles per hour and has an Ikea chair on it?
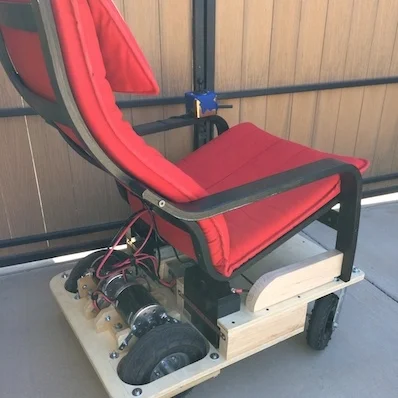
The Office Chairiot Mark II is the second generation of motorized office chair brought to you by yours truly. Why motorize an office chair? That's a silly question and I will not dignify it with an answer. Office chairs are boring. Plus, on a hot summer day, I walk too slowly between our office buildings in ARIZONA. The Office Chairiot Mark II can do it in a fraction of the time and I sweat far less driving it.
At the office, we decided we were going to have a stocking decorating contest for Christmas. The rules were pretty lax, so I immediately thought of interactivity and electronics and blinky lights and whatnot. Well, that, and there was no way in you-know-what that I was going to hot glue glitter and spongy letters to a stocking with electricity being involved.
Here is a video of the final product to pique your interest:
How did I do it? Easy. Some AVR programming (through my usual Arduino hackery) and some simple electronics and BOOYAH! Motion activated stocking with a Santa sign and some jingle bells.
First step was to make a framework to hold the mechanics and the electronics. I used plexiglass and Lexan to support the pop-up Santa sign and to act as the general body of the mechanical works inside the stocking. The layers of plastic were riveted together.
To push out the stocking into shape to make room for the guts, I took extra heavy gauge copper wire I had in my electrical drawer and used pieces of that for "ribs."
The sign was pushed up out of the stocking with a regular hobby servo and some armature work. The plastic worked as a track to keep in straight and sliding smoothly. The armature was made from parts used in RC airplanes I got at a hobby store.
The next thing was to make it motion sensitive. That was initially going to be controller by a PIR sensor, but it turned out to be too whacky. I settled on a nice little sensor by Sharp that I picked up at Sparkfun.com. They simply alter a voltage depending upon what's in front of the sensor and how far away it is. Really simple to experiment with and get a good idea of what numbers to expect from the ADC to trigger the action.
I tried a number of methods for jingling bells. The first was funny, but a bit difficult to implement on the sticking itself. It involved a wheel (or plastic gear, in this case) and a rod with the bells hanging off of it. The idea was that the motor would push and pull the bells rapidly and make them jingle. It worked on the bench, but not in the stocking.
The ultimate solution I stuck with was simply a cam on a motor behind the bells. When it ran, it smacked the back of the front face of the stocking where the bells were hanging. It was essentially a big honking 12V phone vibration motor.
Wood cam that vibrates jingle bells
Next step: Jingle bells. I tied them to the cheap Chinese-made stocking with thin copper wire as a sort of twisty-tie thing. Worked great. I wasn't very organized about where I put bells, just wanted to get a bunch in the general vicinity of the bell thwacker motor.
The brains behind all of this is, as usual, an AVR microcontroller. I use my own version of the Arduino IDE to upload firmware to my AVRs on the breadboard. The code is super simple. It basically just waits in a loop for the ADC to show a value from the IR sensor that meets whatever threshold I figgered out in my experiments with the sensor and ideal distances for triggering the sticking. When it gets a hit, it turns on the MOSFETs for the servo (the sign) and the motor (the bells). It start the motor spinning for hitting the bells and pushes up the sign. After a few alternating blinks of the [not-added-at-this-time] LEDs, it retracts the sign and stops the motor and cuts power to them both. That's pretty much it. Here's the RoboStocking motherboard:
I even put holly on the board in the etch. :) Because the wall wart that powers this thing outputs about 20VDC, I put a LM7805 5-volt regulator on the board for the logic stuff and another LM7805 regulator for the motor and servo. There was no reason to run the motor at its full 12 volts. It was only smacking the back of the stocking. There are two regulators because the power draw of the circuitry plus the motor plus the servo was causing the AVR to shutdown. Running on their own circuits gives them each the full power available through the individual regulators.
As always, I drew the circuit board in Adobe Illustrator, flipped it and printed it on my Samsung black and white laser. I've found that running the transfer paper through the laminator four times makes the toner really adhere to the copper without problems. I've notice that after four times, when you drop the board with the transfer paper stuck to it into the water bath, it dissolves off the board pretty quickly. The etch afterward is much higher precision, as well.
The only thing left was to draw a cute sign for the slide-up. It took me a bit of trial and error, but I finally drew a decent cartoon Santa in my normal style and slapped a Christmassy looking font in the sign part of the slide-up thing. This setup makes it look like Santa is just hanging out in the top of the stocking. When he slides up, the actual sign is revealed below him, as if he's pulling it up for you.
Santa sign on RoboStocking
With everything assembled, the guts of RoboStocking look pretty cool:
What makes this story funny is that I was not able to finish this silly thing in time for our company Christmas party. I had to put the final touches on it over the weekend and bring it in the Monday following the party. It was met with great reviews, but could not win the contest that had past. :( Oh, well. There's always next Christmas. Sound and lights will be added, I assure you. ;)
The Office Chairiot™ is a project I've been designing and building since last summer. The Office Chairiot™ is a battery-powered office chair towing device built with custom steel work and motorized scooter parts purchased on-line. With the amazing welding skizillz of the father of one of the owner's of the company where I work, my dream of a modular powered office chair came to fruition recently.
The real first run of the Office Chairiot™ was a week ago or so. There were a few hiccups, but with a little on-site tweaking, it ran well considering it was the first time since the design-on-paper stage that it was fired up for realz. Thanks, Mike(s)!
The steel frame was reworked a little from the first run and arrived last night. It was late and time was short. Sadly, due to a wiring... Due to owner stupidity and some crossed wires, the test drive last night was postponed until this morning. Thankfully, the reversed wiring didn't result in a SECOND lost speed controller. There were no hisses or pops, as we were incredibly careful while testing the connections. Once I actually followed my diagrams, I realized we'd simply hooked it up incorrectly.
So, this morning, I reconnected everything properly, labeled the wire harnesses with my snazzy P-touch labeler, and made the first successful run of the Office Chairiot™ around the mostly empty office. It was clear that having power run to both tires simultaneously is a good thing. It is far better than torque on just one wheel, of course.
I donned my University of Michigan throwback football helmet and some costume old-style motorcycle goggles and piloted the Office Chairiot™ around the office. I was careful at first. I made a couple of runs at high speed (for an office chair, anyway) down the longer corridors of the office space. It was AWESOME! It's not skydiving, but it's not bad for a day at the office.
I'll post photos taken from the inaugural run soon. There were a few photographers on-hand, thankfully. Here is the first clean video from one of the runs with "cling-ons" aboard:


")


