Programming/Computer

embedXcode: A Better Way to Develop for Arduino on the Mac using Xcode

embedXcode: A Better Way to Develop for Arduino on the Mac using Xcode

If you are writing code for your Arduino on a Mac and you've previously written code using Apple's FREE Xcode IDE, you know that the standard Arduino development environment is lacking in functionality, especially those which professional software developers have had in their IDEs for years. My personal favorite is Apple's Xcode IDE, which is the primary IDE used in developing applications for the OS X on the Mac and for iOS applications on Apple's mobile platforms (which are technically ALSO running Apple's OS X operating system). Find out how easy it is to use a professional-grade IDE to do your Arduino code using embedXcode from Rei Vilo Hobbies.

Introducing: The Office Chairiot Mark II - Labor In Motion Again

Introducing: The Office Chairiot Mark II - Labor In Motion Again

What is electric, goes somewhere between 15 and 20 miles per hour and has an Ikea chair on it?

The Office Chairiot Mark II is the second generation of motorized office chair brought to you by yours truly. Why motorize an office chair? That's a silly question and I will not dignify it with an answer. Office chairs are boring. Plus, on a hot summer day, I walk too slowly between our office buildings in ARIZONA. The Office Chairiot Mark II can do it in a fraction of the time and I sweat far less driving it.

iPotti #2: After a Number One, We Had to Make a Number Two

iPotti #2: After a Number One, We Had to Make a Number Two

iPotti #2 is the latest incarnation of iPotti, the custom bathroom availability monitoring system I built for my employer, meltmedia. I started designing and building the original iPotti in 2010 and it went into operation in early 2011. At the time, there wasn't anything like it that we were aware of. Lately, some other similar systems have popped up and their inventors have done some pretty cool stuff with them. I've found inspiration to reinvent iPotti. Plus, at meltmedia we'd like to use the device for marketing purposes in the near future.

Since 2011, meltmedia has outgrown its original office where iPotti ("number one") is installed. At that time there were about 20-some-odd meltmedians. Today, there are over 60 of us and we now occupy TWO different office spaces on the same campus. On the plus side, with the growth in the number of meltmedians came a growth in the number of pottis at meltmedia to service those meltmedians. On the not-plus side, there is only ONE iPotti #1 and it only watches TWO of the 9 or 10 pottis across two buildings. This situation needed to be rectumfied. [snicker]

Stripe - Card Processing for Developers

Stripe - Card Processing for Developers

Over the past year plus, I've gotten a handful of emails about donations to StuffAndyMakes.com. I've also been offered payments for customizing PCB designs or even just making the files available. Some have requested kits of the Iron Man Arc Reactor for payment. I hadn't taken the time to get it set up. Well, no more! I set up a Donate page, thanks to the amazing people at Stripe! Stripe is a fantastic and ridiculously easy-to-use card processing system built specifically for developers. It's easy to sign up, they take a little in fees per successful charge (2.9% + 30¢) and it even works in your mobile apps. Best of all: It ain't PayPal! Woot!

From their website:

You don’t need a merchant account or gateway. Stripe handles everything, including storing cards, subscriptions, and direct payouts to your bank account. Stripe.js lets you build your own payment forms while still avoiding PCI requirements.


Fix Missing Comments Problem in Notepad WordPress Theme

Some of you regulars may have noticed that comments were magically not appearing at the bottom of some of the posts on this blog. I snooped around in the code behind the theme and discovered one line of PHP that caused comments to sometimes show and sometimes not show. I'd like to share what I found to help others who are having the same problem. Let me add this little tidbit: I LOVE this Notepad theme by Nick La (http://ndesign-studio.com/wp-themes). His work is Very excellent. I contacted Nick through his contact form to let him know about the one-line fix to the comments.php file in his theme. I had installed this theme when my blog was running as WordPress 2-something, not 3.

Here is the easy fix: Edit your comments.php file and find this line (roughly line 24):

wp_list_comments('type=comment&callback=mytheme_comment');

Change it to this:

wp_list_comments(array('callback'=>'mytheme_comment'));

Update the file (save it). That should solve the issue.

Mac OS X Lion and iSCSI Using FreeNAS and globalSAN

Yikes, that title was a mouthful, but I wanted to make sure the search robots gobbled it up with their mouths so that people in my situation would find this article. Short attention span version: I can't seem to get Mac OS X Lion to connect to my FreeNAS iSCSI drives. Lemme essplain what I have and what I am trying to do. In a later update or another article, I will explain how I (hopefully) eventually got this working.

Medium attention span version: This whole exercise was due to my Promise Technologies NS4300N chassis failing to function with Lion. I first noticed it when, after I had upgraded to Lion, my iTunes was pitching a fit about not being able to connect to my music library. Meh. After some research, I found that 1) Promise end-of-lifed the NS4300N; 2) Lion broke the Apple File Sharing (AFS) feature of the device. I'd like to kick someone square in the _ _ _ _ _ for this, but I figgered there was a solution somewhere to solve my storage dilema.

UPDATE: (Slightly more than medium attention span): I used globalSAN from Studio Network Solutions to get Lion going as an initiator for iSCSI. I was able to get the globalSAN thingy to connect and seeminly stay connected to the FreeNAS drives, but once I tried to partition the disks, DiskUtility hung up solidly. I was never able to unmount or do anything to the drives at all. So, apparently, we're still waiting on an update to globalSAN. I have confirmed that nothing is available as of August 2 by reading the forums at SNS. They have acknowledged the issue, but hav not yet updated the product. It is FREE, so I'll be patient.

There's a simple and fully Open Source solution for network attached storage (NAS) that I was not aware of until our genius IT guy ("Drew") opened my eyes this week. You see, I used to be a network engineer and I've lost touch with the latest neatnessisms of the industry. Whether you're a Mac dweeb, Windows dork, or Linux chowderhead, you can build an inexpensive NAS box yourself for not much coin, especially if you have extry parts and computers lying around. Instead of going out and purchasing a $500 NAS chassis like I did a year or two ago, you can take that leftover 2.4 GHz Dell sitting under your desk and make it a useful device again. My Dell used to be a fairly cutting-edge video editing system, but as of late it has turned into an under-the-desk Dust Bunny Collection Unit (DBCU).

Dell 2400 Dust Bunny Collection Unit (DBCU)

Get yourself some cheap SATA drives. Pricewatch.com has 1 TB SATA drives listed as low as $49 now! Nutty, I tell you! I picked up a 4-port craptastic little Sabrent SATA RAID controller for $29 at Fry's Electronics (because I was to impatient to buy one on-line). Don't use the RAID capabilities on the card (in hardware), as FreeNAS will do all this for you and needs to be able to control error handling itself. If you let the hardware do it, FreeNAS won't ever see problems until it's too late. And, to be fair, the controller works perfectly well. I say, "craptastic," because it's a typical Chinese product: The quality isn't the greatest and the language in the help screens is hilarious. "Please wait for seconds for low-level format to be finish." I'm paraphrasing, of course.

I gutted my Dell Dimension 2400 (circa 2004 or 2005), threw the SATA controller and four spare SATA drives I had in a drawer (a 1 TB, a 750 GB, and two 500 GB drives). I also connected a spare EIDE drive and a CD-ROM to the primary connector on the motherboard for booting and to get the initial installation completed.

Four SATA drives on 4-Port SATA controller

Next step, after making sure the BIOS saw all the drives and that everything about the hardware was kosher, I downloaded FreeNAS from http://freenas.org and burned the ISO image to a CD. The first burn produced a non-bootable CD, just like the directions suggested a high-speed burn might, so I burned at only 8X (slowest I could) and that CD worked perfectly. Follow the installation and setup instructions on the FreeNAS website.

As I said above, it doesn't function in Lion. Yeah, thanks, Apple. On a positive note, the FreeNAS server is up and running and appears to be functioning completely normally. It was soooooo easy to install. Pop a CD in, a couple of keystrokes, and viola! Configuring it for iSCSI took a little bit longer, but wasn't difficult at all. I HIGHLY recommend you read up on the terms of iSCSI before configuring. It helps with understanding of the system and makes the configuration that much simpler.

I will report more as I get this functioning.

And here is another UPDATE: I found a link to instructions on how to get the AFP stuff back to a state like it was in Snow Leopard so that you can at least listen to your iTunes music that is stored on your external NAS. Directions are here and I was able to make it work.

iPotti™ Released!

iPotti™ 1.2 bathroom status device So, we have this issue at the office with our single-person bathrooms. We have one "m" bathroom and one "w" bathroom. We have 40+ people in the office. Many people who sit out-of-sight from the bathrooms often walk all the way across our office only to find out that someone else has beaten them to the potti.

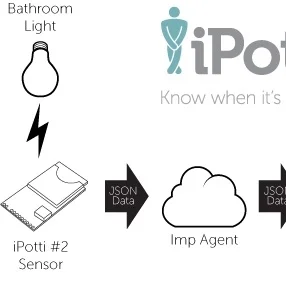
To solve this problem, I took a Make Controller from MakingThings.com, wired a couple of Vishay TEMT6000 ambient light sensors (photo transistors) to it, then wrote a Mac desktop app to sit in the status bar to show everyone the status of the pottis. I call it, "iPotti™" and it works awesome!

At the heart of iPotti™ is the Make Controller. It's an Atmel Sam7 ARM microcontroller with the Make Interface Board stuck to it. The Interface Board has Ethernet, USB, power and breakout headers for the pins of the microcontroller. I wrote a slim little piece of firmware for it that simply broadcasts UDP packets with the status of the pottis. It broadcasts a packet about every couple of seconds.

At the receiving end of the iPotti™ system is a little Mac OS X app designed to sit up in the OS X status bar:

iPotti™ in the OS X® Status Menu

iPotti™ Status Menu - Men Busy

The letters are green when the pottis are available. They turn red when the lights go on inside the bathroom. Lights are the whole trigger in this device. I didn't want to get into sensing AC current in the light wiring or tapping into the switches. This was the cheapest and easiest to get done quickly and without forking out too much coin.

The status menu item has a drop-down menu, as well. It's how you quit the app or check the About dialog:

iPotti™ Menu

The About dialog is pretty simple, but it turns out to be indispensable, since I've now released about three updates to the client software.

iPotti™ About dialog

The sensors see ambient light like the human eye does. I mounted them up above the bathrooms and oriented them to look through little vent holes in the lighting canisters. The light cans keep themselves pretty cool, so there shouldn't be any worries about melting the little sensor thingies. (Read on to see the sensors and their PCBs.) Here is what they look like mounted near the ceiling light cans:

iPotti™ light sensor in position

The sensors are spliced to 4-wire alarm cables that run back to the main iPotti™ server. The two cables join into a single RJ-45 connector (same one used for Ethernet, looks like a big phone jack connector) and then snap into a port in the side of the iPotti™ device box.

Another sweet technical feature of the installation is that our office uses IP phones that get their power from the Ethernet switches. It's call, "POE," which stands for Power Over Ethernet. We bought a little Cisco®/Linksys® POES5 5-Volt splitter that happened to have the proper little coax power connector AND it was the proper polarity, so I didn't have to do anything to hack it together. Here's what it looks like connected up, powering and communicating (outside of the case, of course):

iPotti™ powered over Ethernet

Inside its case, the iPotti™ looks like this:

iPotti™ put together in the case

The Make Controller doesn't fit perfectly in this spare project box I had, but it's good enough for a device that nobody will ever see (hardly ever, anyway). The two white cables protruding from the left side of it are being replaced with the RJ-45 jack for the sensors. Originally, in version 1.0, the cables went right inside the case, wrapped around a screw post for strain relief, and then jacked into the controller.

The latest incarnation (the one that is live and connected now) uses some recovered USB ports from some circuit board I had in my junk pile. I took the ends off of two old USB cables and spliced them onto the ends of the bathroom light sensor cables. I should have done that from the start, but I was lazy and anxious to get this thing up for testing. Now, I can easily disconnect it and update it or maintain it.

The only fab I had to do was on the sensors. They are surface-mount (SMD) and they require a resistor, so I made little PCBs for them using my usual toner-transfer process:

Spare or reject sensor PCBs

Fully assembled, they each look like this:

iPotti™ ambient light sensor

The real trick will be getting people to remember to turn of the lights behind them. We've had signs up for the for the longest time to remind people. Occasionally, someone does forget. Overall, the solution works well.

Lessons learned from this project: A little Make Controller doesn't fair well as a web server when 40+ workstations are hitting it every two seconds. The 1.0 version of the system had the iPotti™ main device set up as a web server and the iPotti™ app hit the server every couple of seconds. This was painful and dumb. I chose that over UDP out of laziness and fear of the unknown (I had never set up UDP broadcasts on the Make Controller's lightweight IP stack AND I hadn't done it yet in my Cocoa [Mac OS X] development adventures). Turns out that UDP was stupidly simple to implement on the Make Controller AND for OS X. I should have done it from the get-go.

Here are some other photos of the installation and a famous red box...

Do not lick soldering irons

SparkFun box!!!

Designer and his new creation

Objective-C/iOS/iPhone: UIColor from NSString

Until I find a home for my little snippets of code, here is where they will go. While building an iOS (iPhone) application, I needed a quick little method in Objective-c that would take strings of color codes from data provided by web developer peeps and convert those string values into UIColor objects. For instance, sometimes we'd get "#ff7401" from the data for our app. Sometimes it might be formatted like, "0xff7401" or even just, "ff7401". I simply created a category on NSString to make is super-simple.

NSString+meltutils.h

[code lang="objc"]

//  UIColor+meltutils.h

//  Created by Andy Frey on 10/15/10.

#import <Foundation/Foundation.h>

@interface NSString (meltutils)

- (UIColor *)toUIColor;

@end

[/code]

NSString+meltutils.m

[code lang="objc"]

#import "NSString+meltutils.h"

@implementation NSString (meltutils)

- (UIColor *)toUIColor {

unsigned int c;

if ([self characterAtIndex:0] == '#') {

[[NSScanner scannerWithString:[self substringFromIndex:1]] scanHexInt:&c];

} else {

[[NSScanner scannerWithString:self] scanHexInt:&c];

}

return [UIColor colorWithRed:((c & 0xff0000) >> 16)/255.0 green:((c & 0xff00) >> 8)/255.0 blue:(c & 0xff)/255.0 alpha:1.0];

}

@end

[/code]

So, to use this, all you have to do is import the header file and send a message to your string that contains the color code:

[code lang="objc"] #import "NSString+meltutils.h" ... UIColor *c = [@"#ff840a" toUIColor]; ... [/code]

Hope that helps someone out a little!